|
|
|
|
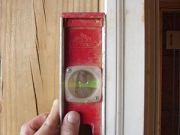
Step 5: Slide the door in place into the opening in the framing. Besure not to drag the caulk or move the sill barrier. Check for level on the vertical jambs. |
|
Step 6: The threshold also needs to be leveled. Remember not to force the jamb out of square. |
|
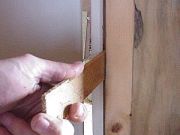
Step 7: To adjust the level, use pairs of wooden shims between the door jamb and the wall framing. This is the tricky part. You need to be sure not to bow the mid section of the door and also add sufficient shim thickness to keep the door in place. When pushing the jambs into the opening, do not push too hard on the corner to the extent that the plane of the jambs become misaligned with the door. Basically if you push on the top of the jamb above the handle, a gap will appear in the lower section of the door. |
|
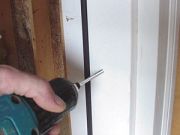
Step 8: To secure the jamb, pre-drill at least 4 holes in each of the jambs. The manufacturer may recommend, but remember it is just these few screws which will keep the door in place. Use a drill bit the diameter of the shaft of the 2-1/2" screws. |
|
Step 9: Screw the jambs in place. On exterior doors, use a galvanized/coated or stainless screw. That's it! |
|
|
|
|
|
|
|
Related articles
|
||||