|
|
|
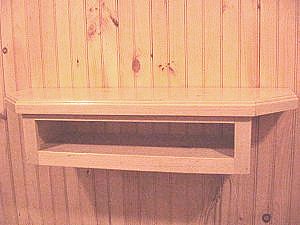
Wooden Electronics Shelf |
|
It's time to replace the wooden crates and cinder block shelves. This wooden shelf project will hold your stereo or electronics gear without taking up any floor space. |
 |
|
Items needed:
Power saw (Table preferably)
Sanders (belt, orbital) Drill and bits Bisket joiner Clamps Router Wood glue Wood shelving
|
Safety Suggestions and Tips
Always use safety glasses when working with power tools.
|
Level of difficulty
 Time Required: 4 hours
|
|
|
|
Steps |
|
|
|
|
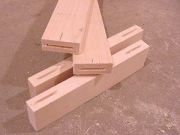
Step 1: The first step if to rip pine shelving into 2-inch wide strips for the front face. The construction used here is much like kitchen cabinets. |
|
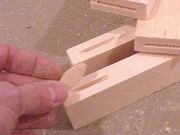
Step 2: Next, using a biscuit joiner, route out for the wafer on the side rails and top and bottom frame. Glue the four pieces together, clamp and set aside to dry for at least 30 minutes. |
|
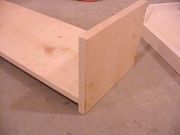
Step 3: Using a table saw, cut the two side pieces and lower shelf. The shelf can be mortised in or just nailed to the side pieces. |
|
Step 4: With the front face frame dry, sand both sides flush. Center the face frame over the sides and shelf. Glue and nail this to the two sides and bottom shelf. |
|
|
|
|
|
|
|
Related articles
|
||||