|
|
|
Coping Base and/or Cap Trim |
|
Base trim (molding) is the molding that goes down between the wall and the floor. Occasionally, it is made from a hardwood and finished clear which adds a nice touch. Inside joints for the shoe (base) and cap molding are normally "coped." This includes cutting the trim to fit the profile of the trim on the adjacent wall. This process is as an art so practice on a scrap piece first. Please note that this particular process is not appropriate for coping ceiling trim. |
 |
|
Items needed:
Coping saw
Back saw Miter box File (optional) Pencil |
Safety Suggestions and Tips
Measure twice, cut once
Use new sharp backsaw Do not freehand cut miter |
Level of difficulty
 Time Required: 4 hour
|
|
|
|
Steps |
|
|
|
|
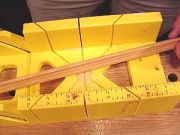
Step 1: Cut the molding to proper length. Carefully mark the trim and place it in the miter box. Place the mark you made in front of the 45 degree slot and, using a back saw in the 45 degree slot, cut the molding to length. (More complex moldings must go into the miter box upside down and backwards.) This type of cut will expose the profile of the molding so that you may cut it with a coping saw. |
|
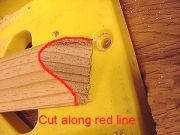
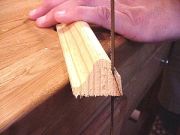
Step 2: Secure the molding on a table or other stable surface and, holding the coping saw perpendicular to the work, begin to cut along the profile of the molding. |
|
Step 3: Work the saw easily as it has a thin blade. This will enable you to slip this cut up tight against the existing trim. |
|
Step 4: Take the piece of trim and test-fit it into place. Unless you have a lot of practice or are lucky, there will be gaps |
|
|
|
|
|
|
|
Related articles
|
||||