|
|
|
Repairing damaged trim with putty |
|
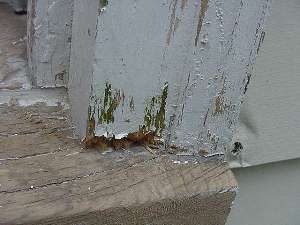
Exterior trim, especially where brick mold and window trim meets the sill or sash is especially prone to rot. The best way to fix this is to replace the trim but this is not always desirable. The next best way is to chisel out the damaged trim and fill it with putty or an epoxy filler. |
 |
|
Items needed:
Chisel
Exterior wood putty or epoxy Utility knife is helpful Putty knife |
Safety Suggestions and Tips
Check can for working time
Use eye protection Use care with the chisel |
Level of difficulty
 Time Required: 2 hours
|
|
|
|
Steps |
|
|
|
|
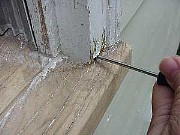
Step 1: Check the extent of the damage. The easiest way to do this is with a small screwdriver. Probe the extent of the damage. If it is more than 1/2 inch deep you should probably reconsider replacing the molding. |
|
|
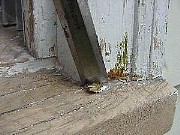
Step 2: Using a chisel or utility knife, clean away all of the rotting and deteriorating wood. Ensure that all of the damaged wood is removed or you will have bigger problems to deal with in the future. If, in the process of cleaning out the damaged wood, you find that the damage is more extensive than previously thought, please reconsider replacing the molding. |
|
Step 3: Let the exposed wood dry completely. Before continuing with the repair, the wood needs to be as dry as possible. If the wood is still damp when you cover it up, the moisture will be sealed in and rot will ensue. |
|
|
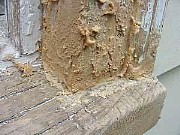
Step 4: Begin working the putty into the damaged area. Begin to forming the putty to the same profile as the molding using a putty knife or whatever works best. Be careful about using your fingers as the putty or epoxy sticks to everything. If you are using exterior putty, get it as close as possible to the final shape as this material is very hard when dry. |
|
|
|
|
|
|
|
Related articles
|
||||