|
|
|
Fixing a Torn Screen |
|
Window screens are often abused, not just by the kids. Sometimes the dogs and cats get in the action. The repair is easy enough, especially with the newer plastic type screen as compared to the older aluminum type screening. Read on and see how it's done. |
 |
|
Items needed:
Screen repair material
Spline Convex/concave roller Utility knife or scissors |
Safety Suggestions and Tips
Be careful when cutting screen.
|
Level of difficulty
 Time Required: 30 minutes
|
|
|
|
Steps |
|
|
|
|
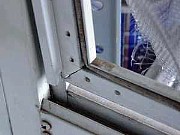
Step 1: The first step is to remove the screen frame. In this repair, we are working with a screen from a storm door and the screws need to be loosened and twisted. Next, lift the frame out of the channel. Lay the frame down on a flat surface. |
|
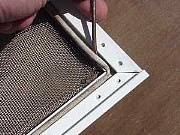
Step 2: You will need to remove the old spline section by prying the spline out of the channel. You can then pull the remainder of the spline from the channel. |
|
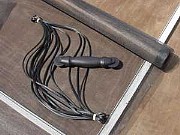
Step 3: Screen repair kits often include screen which is 36 inches wide. If you purchase a "all-in-one kit" the screen will probably be 36" x 84", or enough material for two windows. The kit includes the screen, a roller and new spline. Do not reuse the old spline. It has probably become brittle and will not hold the screen as tightly as new a spline. |
|
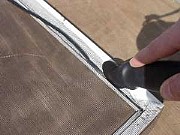
Step 4: Lay out the new screen, allowing the screen to overlap the frame. Be sure that there is at least 1/2" of screen beyond the groove in the frame. Before you insert the new spline, you should embed the screen in the grove using the convex roller, but just along one side. Do not use the concave roller to embed the screen, as this will cute the screen material. Now, starting in a corner, roll the spline into the groove using the concave roller. Be careful not to slip off and cut into the screen with the sharp edges of the roller. |
|
|
|
|
|
|
|
Related articles
|
||||