|
|
|
|
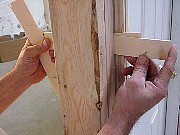
Step 5: Pull the door out, remove the shipping nails and place a bead of caulk (for outside doors) under the area where the threshold will go. Slide the door back into the opening and use shims from the inside and out overlapping each other. You should use a couple of sets of shims on each side. |
|
|
Step 6: Make sure that you keep a level on hand to ensure the door is plumb. Don't use any nails until the shims are holding the door exactly how it has to be. There should be at least an 1/8" all the way around between the door and the jamb The door frame should also be flush with both sides of the wall. |
|
|
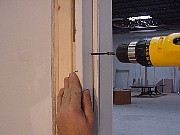
Step 6: Nail (or screw) through the middle of the jamb to the stud wall and above to the header. It will disturb the set of the door less if you nail through the shims first. Set the nails slightly so that the doorstop (the thin strip of wood that stops the door in the middle of the jamb) will cover the nails or so that they can be filled with painter's putty. |
|
|
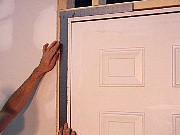
Step 6: The door should now be able to swing freely from open to closed position without brushing against the jamb. If this is NOT the case, you can use your hammer with a wood block to make some minor adjustments. After it is secure, the rest is simple trim work. Use finishing nails and clean cuts with accurate measurements to frame the sides and top of your door inside and out. I always advise using just a little construction adhesive or caulk behind trim work to help the little nails. If there are gaps in your trim work, caulk them with paintable caulk if it is to be painted, sandable wood filler if it is to be stained. |
|
|
|
|
|
|
|
Related articles
|
||||