Repair a big drywall hole |
|
Have you ever been faced with trying to repair a large hole in your wall which was caused by an errant board? |
 |
|
Items needed:
Joint compound |
Safety Suggestions and Tips
Check for wiring behind drywall
Use eye protection Wear gloves Use dust mask |
Level of difficulty
 Time Required: 4 hours
|
|
|
|
Steps |
|
|
|
|
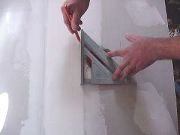
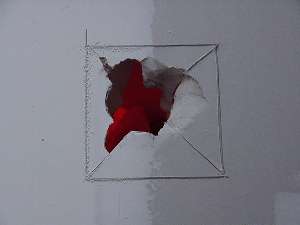
Step 1: Using a square, or something similar, mark a square around the hole and cut it out. |
|
|
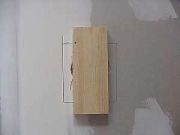
Step 2: This makes it easier to cut another piece of drywall to patch the hole. When cutting the hole, make sure you minimize damage to the back of the drywall (it looks like this from behind). Cut through the drywall and paper on the back. |
|
Step 3: Cut a small scrap of wood (1x4 works good) slightly longer than the hole. Being careful not to drop the board, insert it into the hole. |
|
|
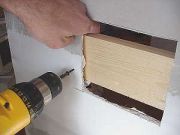
Step 4: Use drywall screws to secure a the board (or similar material) behind the drywall in the middle of the hole. Drive the screws so that they are just slightly below the surface of the drywall. If the hole is large you may need more than one brace. |
|
|
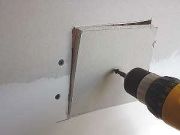
Step 5: Cut a piece of drywall to fit the hole. Secure the patch to the brace with one or more drywall screws. Again, drive the screw slightly below the surface of the patch. If possible, mount the patch so that it is slightly below the surrounding surface. |
|
|
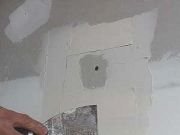
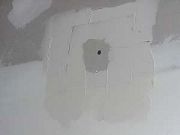
Step 6: Most professionals recommend that you tape around the perimeter of the patch. This keeps the joint compound from cracking when the wall moves. Apply compound around the perimeter of the patch and apply the tape around the edge. |
|
|
Step 7: Using a 4"-6" knife, firmly press the tape into the compound. Continue working the tape, squeezing the compound from underneath the tape. The tape should be free of wrinkles when you are done. Make sure that you also fill in over the screws. Let the compound dry overnight and gently sand it the next morning. Make sure you do not sand into the tape. |
|
|
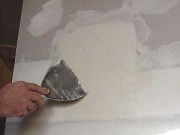
Step 8: Using a wide (6" or wider) knife, spread the joint compound over the tape and the patch. The area you cover should include several inches of undamaged wall. This is called "feathering" the compound and helps hide the repair. After the joint compound is dry, usually 24 hours, you need to sand the patch again. You should not sand the patch so much that the tape shows. Another coat of joint compound and another round of sanding may be required. |
|
|